How To Upload Sales
This page helps you to 'Upload Sales'.
It's part of the 'Sales/Sales' how-to series.
Sales Upload
Open any sale.
Notice the buttons at the top of the screen.

Select the 'Upload Sales' button.

The 'Upload Sales' pop-up appears.

Notice the 'Options' section.
There are three checkboxes:
-
Fail when address details are incorrect 1
-
Prefer Centrally Managed Products when in conflict 2
-
Mark sales to auto deliver when stock arrives 3

Select the 'Download Template' button.

The template CSV is saved to your pc.
Open the file.
The template looks like this.

Remove the template product rows and add your own.
Save the file.
Select the 'Choose File' button.

Select your file.
Note
The uploader only accepts CSV format.
Make sure you're in test mode.

Select the 'Upload' button.

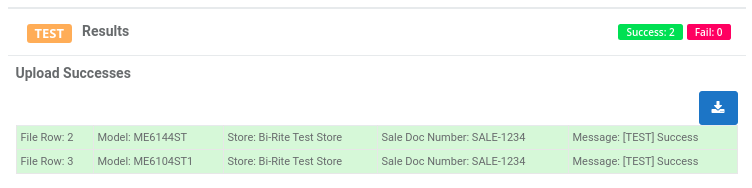
Notice the upload results section.
- Successful rows (green)
- Errors (red)
If you see errors:
-
Try to fix the errors listed
-
Then, try the upload again
-
Repeat until you see no more errors
Turn off the test switch.

This takes you to live mode.
Notice the status changes to 'Live'.

Select the 'Upload' button again.
Notice the upload results section.
Your upload is complete.
Notice that the uploaded sales are now in your sale search results.
Note
See explanation of errors here.
-
Uncheck this to bypass the customer address validation. Caution: some sales may have issues if the customer address details aren't correct. ↩
-
Your local products might conflict with the centrally managed products from Head Office. Change the product code to avoid this. ↩
-
Auto deliver means if there is stock on hand, the item is delivered for you automatically. ↩