The Sales Screen
This page helps you to understand 'The Sales Screen'.
It's part of the 'Sales' getting-started series.
New Sale
This section of the guide describes how to make new sales.
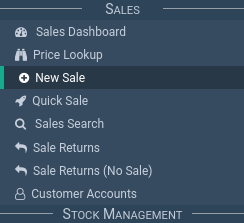
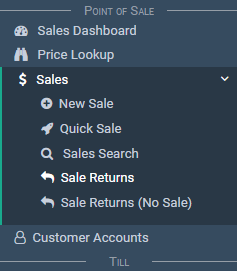
Select the 'Sales' option from the left menu bar.
Select 'New Sale'.
Search for a customer.

Select the 'Select' button.
Customers
This section of the guide describes how to use customers.
Use Existing
Search for the customers details in the search field.
This field is 'dynamic' meaning you can search based on any customer information.
This includes:
- Name
- Address
- Phone number
- Email address
If details are partially entered, the system simply presents a list of ANY customers whose details contain the content entered into the search field, as seen in the screenshot below.
Select the desired customer from the list.

Check if all the information shown is correct and update as required.

Select the 'Select' button.
Create New
A user can create a new customer in the system by switching the toggle found in the customer search area from 'search' to 'create' as seen below.

Follow the below steps to create a new customer:
Important
Remember that each customer entered into KNAPS is given an 'Account'.
Think of the account as a hub where all information regarding the customer and their history can be found.
Enter a name for the customers account. By default, KNAPS will detect and use this name for the customer however you can adjust this as required.

Enter as many of the remaining details as possible.
These are required at minimum:
- Name
- Mobile or landline contact
- Address
Select 'Select' to save the details and initiate a new sale.
Delivery Address
This section of the guide describes how to set the delivery address.
If the delivery address is different to the default address it can be entered.
There are two ways.
The first is to enter it when you select a customer.


Alternatively.
If a sale is already open, you can still change the delivery address up until the point the stock is actually delivered.
To do so, follow the below steps.
Select the box that says: 'Delivery Address' next to the customer name.

This will open up a new window where the alternative delivery address can be entered.

Edit the address fields as required and select 'Save'.
This delivery address will be printed on the delivery section of the sale invoice, delivery dockets.
Sale Lines
This section of the guide describes how to create sale lines.
Products
Once a new sale has been initiated, follow the below steps to add products as required.
When a new sale is initiated, the cursor would be focused on the 'Input model' field.
A product can be searched by entering part of the:
- Product code
- Product description
- EAN
- Brand name

Search results also show status, available stock and group stock for the product.
Choose the desired product from the list.
This will load the product on the screen.

Check:
- The price and update as needed
- Adjust the quantity (defaults to one)
- Choose the stock type (if applicable)
Select the 'Add' button.
Note
If applicable, KNAPS will offer to add a backup plan (BUP) to the sale.
Backup plans are filtered before being offered to you so only ones which are applicable to the most recently added item are displayed.
Simply select the 'BUP' to add it to the sale, otherwise select the 'Cancel' button to decline.

Repeat until all the desired products have been added to the sale.
At this point, all will be displayed under the 'Sales Details' section of the screen.

Charges
Create
Charges are added via the 'Totals' section.

Select a 'Charge Type' and add the relevant details.

Delete
To remove a charge select the 'Charges' button in the 'Totals' section.
This will bring up the 'Charge Lines' pop-up.
Locate the charge you want to delete and select the red 'Delete' button for that line.

Edit
Currently there's no way to edit a charge.
You need to delete the existing charge and create a new one.
Backup Plans
This section describes how to add a BUP (Backup Plan) to a sale when the invoice status is either Open or Partially Invoiced.
Below are the steps to add BUPs when they were not added initially, or the customer changes their mind and wants to add a BUP towards the end of the sale.
When adding an item to a sale, KNAPS will automatically bring up a window displaying any suitable BUPs.
These BUPs pertain to the particular item being sold.
If this window is dismissed you can still add a BUP to the sale.
Select the BUP button on the product sale line.

A pop-up appears containing a list of all BUPs relevant to the model in question.
Select one, the pop-up will close off and return to the original sale document.

To remove or adjust the BUP quantity or price, simply select the 'Edit' icon on the BUP sale line.

Adjust the values in the pop-up as required and select 'OK'.

Editing Sale Lines
If a mistake is made while adding a product to a sale, simply select the 'Edit' icon next to the line in question.

Once any changes have been made, select the 'OK' button to accept.

Sale Transactions
This section of the guide describes how to make sale transactions.
Payments
You can take payments once the sale details are entered and the customer is ready to pay.
Follow the below steps to take a payment for a sale.
Select the 'Payments' button to open the payments screen.

By default, the payment amount is set with the entire remaining balance of the sale.
Check the amount to be paid is correct and adjust as required.
By default, the 'tendered' amount mirrors the 'payment' amount.

If the customer is paying via cash, the tendered amount should be amended to reflect the amount of money being handed over.
This allows the system to calculate change.
Select the tender type from the options available:
- Cash
- Card
- Cheque
- Eftpos
- Direct Debit
- Account
- Finance
Note
Split payments across multiple tender types is possible.
However they must be processed individually.
If the customer wanted to pay $50.00 in cash and $300.00 on card you would process one payment for the cash then an entirely new payment for the card portion.
Once the details are correct, select 'Pay' to officially take the payment.
If the sale is fully paid, the payments pop-up will close off automatically. Otherwise, select the 'Close' button to close the screen.
Once a payment is taken, a receipt will appear available for viewing/printing on the 'Cust Receipts' section.

Selecting the print icon will open the receipt in a new tab
It can either be printed or simply closed again.
Below is an example of the layout of receipts generated in KNAPS.

When a payment is made, the sale is automatically saved and given an official sale number.
This is visible in the 'Sale Header'.

The sale value and payment total displayed at the bottom-right of the document are also updated to reflect the changes.
Change
Here you'll see how to process a cash payment in order to correctly record change given.
Select the 'Payments' button to open the payments pop-up.
By default, the 'Payments' field is populated with the remaining balance of the sale.
Adjust the tendered amount to reflect the amount received in cash from the customer and select the 'Pay' button.

This will process the payment and print a receipt.


The change given will appear along with the total on the main sales screen.
Hover over the sale balance icon.

Also, the payments history can be found in the sales document settings button.
Find it in the top right of screen.

This will display a list of the sale's payments.

Invoices
This section of the guide describes how to create invoices.
You can generate an invoice after taking a payment.
KNAPS will only allow you to create an invoice for a product if enough money has been taken.
Items on a sale can be marked for invoicing individually by using the plus or minus buttons under the 'To Invoice' column.

Otherwise, if the entire sale is ready to be invoiced, you can select the 'Invoice all' button.

Once the desired items are marked to be invoiced, select the 'Create Invoice' button to generate the paperwork.

This will prompt for a confirmation message regarding delivery.
If the product is ready to be delivered, choose 'Yes', otherwise 'No'
Note
In KNAPS the term 'Deliver' is equivalent to 'Release' in SPAN.
An item should only be delivered/released if it's leaving the store.
It's at this point that KNAPS will officially attribute a specific item of stock to the sale and remove it from the stores stock holdings.
Now, the system will offer to either 'Print' or 'Email' the invoice.

Selecting 'Print' will open the invoice in a new tab ready for printing.

If the 'Email' option is selected, a pop-up will open with the document already attached and the customers email address pre-populated (If available).

The sale document status will change to reflect the changes.
Margin Calculator
This section of the guide describes how to use the margin calculator.
It's accessed via the 'Total' section.

See and adjust margin calculations for each sale line

Sale Totals
This section of the guide describes how to read your sale totals.
They can be seen in the 'Totals' box towards the bottom right of the screen.

Hovering over the 'Sale Balance' icon displays the sale balance breakdown.

Warning
One has to either 'Save' the sale or take 'Payments' before navigating away from the screen.
Otherwise, all the entered data will be lost.
Documents
This section of the guide describes how to view and print documents that are related to a sale.
Printing
Here you'll see how to print:
- Customer Orders
- Invoices
- Customer receipts
- Delivery dockets
Select 'Sales' then 'Sales Search' and search for the sale which requires a reprint.
Once the sale is open on the screen:
Select the 'Print/Email' button to print the Customer Order document.
Use the same button to email.

Select the print icon in the 'Actions' column to print an invoice.
Use the @ symbol to email.

Select the print icon in the 'Actions' column to print a receipt.
Select the print icon in the 'Actions' column to print a delivery docket.

Emailing
If the email option was selected, a pop-up will appear.
Add the relevant details and send your email with the document attached.
Select 'Send'.
Notes
Customer Order
Adding a note to the Customer Order document is easy.
You'll find the option here in the Notes section.

You can add:
- Customer Notes (appears on the bottom of the Customer Order)
- Store Notes (appears in the 'Notes' section on the screen only, i.e. not printable)
- Purchase Order Number (appears on the top of the Customer Order and Invoices)
Other Docs
Add notes to the following documents by selecting the 'Note' icon next to the print icon.
- Invoices
- Customer Receipts
- Delivery Dockets
For example.

A pop-up will appear where you can add your note text.

The text will appear on the relevant printout.
Swap-over/Exchange/Replace
This section has two use-cases
- Exchanging a product on a sale (same model)
- Replacing a product (different model)
Return Original Item
Start off by returning an item.
Select the 'Sale Returns' menu item.
Use the query field to search for the original sale.
Select the 'Return' button on the sale line (far right-hand side).

An alternative way to find the sale return is to access it via the sale itself.
Select the settings spanner and select 'My Returns'.
Once the return screen is open, select the lines to return.
Select 'Refund and Return Items'.

If the item being returned is faulty, add the relevant details:
- Check the 'Mark as Faulty' checkbox.
- Add a comment describing the fault/damage.
- Lastly, select a return reason.
If the item isn't faulty, you can simply select a return reason and then proceed.
Select 'Proceed'.

The next window to appear is the refund window.
In the event of an exchange, simply select the 'Return item without refund' button:
- The item will now be returned back into stock and a goods receipt created.
- No refund will be created.

You have now returned your item.
Add The Exchange/Replacement
The next step is to add the new exchange item.
In the event of an exchange, this is done back in the original sale, NOT a new sale.
Open the original by selecting the spanner icon located in the top right-hand corner of the returns screen.
Select 'My Sale Doc'.

This scenario has two use-cases:
- If you're doing an exchange or swap-over.
- If the customer is adding a completely different product.
So far you have selected the 'Return item without refund' button.
What this will do is return the item back into the stock but will not refund the payment.
Now, open the original sale (you might need to refresh the sale page):
- You'll notice a pop-up appear that informs you that the sale has been overpaid.
- It'll ask you if you want to give a refund.
- Since in our example we'll be giving the customer a different item (using the previous payment).
Select 'Cancel'.

Now in the existing sale.
Hover over the 'Sale Balance' icon in the 'Totals' section.
You'll notice:
- The sale balance has reduced
- The return value is listed (this is not a 'Refund' value)

Now you're happy with those figures.
Add the new item that the customer wants, just like in a normal sale.
Notice you have two sale lines now:
- One for the returned item
- One for the new item
You'll notice that the sale totals uses the 'overpaid' amount towards the sale balance and it's now back at zero.

All that's left to do is:
- Take the remaining outstanding payment from the customer (if any)
- Select the 'Invoice All' button to issue a new invoice to the customer.
Note
Adding additional items to a sale after it has been invoiced does NOT alter any existing invoices.
Instead, a new invoice can be created every time a new item is added.
Related Tutorials 
Sales